Saturday, May 12, 2012

Mother's Day gift idea: Birth month flowers

As you may know by now, Mother's Day is tomorrow. If you are still stuck on what to get dear old mum, consider giving her mums!
Personally, I prefer to give gifts that last, such as potted flowers or books. They strike me as more personal, more meaningful, and they serve as a constant reminder of important events.

Calendula is the birth flower for October. 


After planting some calendula for Heather, I learned that the flower has some medicinal benefits. The flower can be used for pain relief from bee stings, and is also beneficial as an astringent. In addition, calendula has has anti-inflammatory effects, which can help the skin, and useful as a gargle for sore throats. All of this just added to the flower's special meaning as Heather's birth flower.

Here is a list of birth month flowers you could get for the moms in your life (don't forget grandmothers and the mother of your children). Make a lasting impression, and give a gift that will keep on giving, and growing.

January - Carnation
February - Violet
March - Daffodil
April - Sweet pea or Daisy
May - Lily of the Valley
June - Rose
July - Larkspur
August - Gladiolus or Poppy
September - Aster
October - Calendula
November - Chrysanthemum
December - Narcissus

I hope this helps make your last minute Mother's Day shopping a little bit easier.

Thank you moms for the gift of life! Cheers!

Wednesday, May 2, 2012

My herb garden


I just wanted to share some pictures of the various herbs I'm growing right now.  Hope you enjoy.

First up are my chives.  I planted these last September, and they are hitting their stride now.  I got worried for a couple of months in winter, and I thought they were going to just die, but I kept watering them as needed, and now they are thriving.  I love chopping them up and adding them to my salads, soups, and mashed potatoes. 
Here is one of my several mint patches.  I started this patch by transplanting some mint that I thought would die when we added several feet of soil to level our backyard.  Now this transplanted patch AND the original are growing nice and tall, with leaves as long as my fingers.  I'm eating some leaves chopped up in my ramen noodles as I write.   
Next is my oregano.  This guy is a fighter. He got too hot and all but died at the end of last summer.  Here he is now, bouncing back nicely.  I picked off a couple of leaves so Heather and I could sample the powerful flavor of the fresh leaves.  I don't recommend this.  It burns and numbs the tongue and lips a little.  Oregano is great in sauces, and also has antifungal and antimicrobial effects.  
Below is a mother/daughter picture of my thyme.  The plant on the right was transplanted using shoots from the plant on the left. I placed it among my lavender because they have similar watering requirements (not terribly often).  The transplanted thyme is only German thyme, but the pot on the left contains a mixture of Lemon and German thyme.    


Herbs are fun to grow, and most aide in digestion and have lots of antioxidants.  They require full sun for 6-8 hours a day, and some (not all) lose the flavor in their leaves once they begin to flower, so choose accordingly.    Happy harvesting!  Cheers!

Tuesday, May 1, 2012

Pa pa pa pa, who loves the sun?

Not everyone, but sunflowers sure do! Sunflowers flare their bright petals out like the Sun's rays, they thrive when it's warm, and they will turn their huge heads to face the Sun as the day goes by (actually, I think all flowers do, but it's very noticeable with these giants).  
Two of the several sunflowers Lily and I planted have bloomed, and I just had to post this picture I took today. The sunflowers we're growing now are third-generation descendants from a bag of seeds I bought the summer after Lily was born.  I highly encourage growing sunflowers if you have kids.  Watching them grow, and then harvesting, roasting, and planting the seeds is a very satisfying gardening experience.  Kids need plants that either grow fast or grow big, and sunflowers do both. 

In addition to their beauty, sunflowers have a lot of nutritious value.  They are high in iron, and if you're trying to cut down on your meat intake, sunflower seeds are a good source of protein and fat.  In addition, an ounce of sunflower seeds contains half of the recommended daily intake of Vitamin E, which serves as an antioxidant, helps skin to look younger, and also aides brain function. 

If you successfully grow one sunflower you'll never have to buy seeds again.  One sunflower can yield, at the very minimum, hundreds of seeds.  This is plenty for roasting and planting, as long as you protect them from the birds.  I do this by hanging a paper grocery bag over the flower head when they start to droop from the weight of the seeds.  When the back of the sunflower head is yellowish, I lop it off and  let it dry out before harvesting the seeds by rubbing the heck out of the flower head with some sturdy work gloves.   

To roast sunflower seeds, spread them out in a single layer on a baking sheet and roast them at 300 degrees for 30-40 minutes.  Test them out occasionally by trying out a seed, and also look for small cracks down the side of the shell.  When they are ready, let them cool, and then start snacking.  Sidenote:  you cannot plant roasted seeds.  If you want to save some for planting, do this ahead of time. 

My favorite way to eat sunflower seeds is to sprinkle them on a salad (like a nutritious beet greens salad).  They add flavor, texture, protein, and fat to my high fruit and vegetable diet. 

Dandelions: Getting to the root of the problem

Kids love dandelions because of how easily those fluffy seeds float away with the slightest puff of wind. Gardeners despise them for the very same reason.

Dandelions have a very effective seed dispersal system, which means you will always have the chore of pulling these god-forsaken weeds out of your holy garden. Before you toss these weeds in the green waste, however, think about what this unwanted guest may have to offer.

Dandelion leaves serve as a diuretic, and can be a healthy addition to your salad. This is any easy way to help rid your body of excess sodium, which can lead to high blood pressure. It's easy to take in excess amounts of sodium because of its use as a preservative in a lot of processed and fast foods. Consider adding dandelion leaves to a salad to help counter this trend and improve your cardiovascular health.

The dandelion root is also beneficial as a detoxifier. It cleanses the liver and aides in kidney function to remove wastes and toxins from the body. It does this by helping the body get rid of liquids by way of urination and defecation, so stay relatively near a bathroom if you drink dandelion root tea.

You could very well by dandelion tea at the store, but since you will have an ongoing struggle with this plant in your garden anyway, save your money and treat this weed more as friend than foe.

I found this four foot behemoth hiding in my star jasmine bush yesterday. Of course I removed it, but I'll be mixing the leaves with some recently harvested beet greens. I'm going to make a tea out of the root and throw in some peppermint and spearmint for flavor.

When it comes to dandelions, try to see the silver lining. Perhaps it will make weeding your garden a little more gratifying.

Happy harvesting! Cheers!

Monday, April 30, 2012

Random acts of gardening: Garlic

As I was taking a friend's advice and preparing to sautée some beet greens with garlic and butter, I found this nice little surprise in the vegetable basket.

My heart leapt with joy as my mind immediately planned for which pot and location to plant this welcome surprise. I've never grown garlic before, so I'm glad for the opportunity. I am also very much anticipating a future harvest and propagation of garlic in my garden.

Garlic is good for the heart and helps maintain healthy blood circulation. Perhaps less known is garlic also enhances the immune system. When garlic cells are disturbed by cutting or bruising the clove, allicin is produced, which serves as an antibiotic and inhibits germ growth and reproduction.

It also tastes great! Garlic is like the bacon of vegetables. You can add it to any meal and your food will taste better, but unlike bacon, garlic helps the heart work better.

As part of the allium family, garlic will benefit from a high nitrogen diet, so this little guy will be getting plenty of coffee grounds to aide its growth.

If you want garlic of your own, the next time you buy garlic at the store, save a clove for your garden and experiment with growing it yourself.  

Happy harvesting! Cheers!

Sunday, April 29, 2012

Why Keep the Roses??

I'll admit that when I look at the four big pots I'm currently using for my rose bushes, most of the time I think about tossing the roses so I can grow some food in those pots. They are just "extra" and provide no tangible return of any kind. Right?

Then I see such a perfect looking rose that all I can think about is how much Heather or Lily might like to have such a pretty flower next to their bedside. It is then that my compulsion to grow all the fruits and vegetables my family eats takes a back seat to my desire to strengthen the connection to my girls with the simple, elegant gift of a perfect rose.

This particular rose reminded me that I can't just grow plants that I want to eat. There are plants that just need to be appreciated for their beauty, not for what they can provide us. Life isn't all about mathematics, that is, doing things only for a good return on investment. Sometimes the extras are essential. I may be missing an opportunity to grow some more food, but I'll reap dividends in the relationship to my girls. The roses will stay.

Happy gardening! Cheers!

Saturday, April 28, 2012

Time to prune the lavender

It's human nature to not want to harm anything that is beautiful and natural, especially a delicate flower.  Sometimes, however, a little pain does have a lot of gain.  You may not want to do it, but it's about the right time of year to prune your lavender. 

I almost killed my lavender plants a couple of years ago because I had assumed that they should get pruned just like my roses.  I took my loppers and cut just about every bit of green off of the plant.  Then I read that I almost certainly killed them because of this violent mistake.  My wife reassured me that "living things want to live", and I kept my lavender stubs hoping that she was right.

As is usually the case, my wife was right.  I soon started to see little green nubs growing out from the truncated branches. Those nubs soon grew into fully-grown leaves, and before I knew it, my lavender plants were on the mend and growing just fine.  Once I was sure they could handle it, I moved them from the pots they were in to a bed in front of my house where they would get plenty of sun and grow into a nice hedge.

Out of guilt from my past abuses, I was reluctant to bring the shears even close to my lavender, and now I have an overgrown mangy beast.  I hate to say that about such a beautiful and fragrant flower, but it's true, and it's time to do the unthinkable... I need to prune it again.

BUT... now I know better.

To get the most out of my lavender, I need to trim it with garden shears a couple of times a year, up to about half of the plant.  This sounds harsh, but it has a few benefits:

1.  It keeps the lavender from looking ugly and brown.  This flower doesn't need a lot of maintenance to look its best, but it does need a haircut now and then.  The flowers turn brown if left on their own, and this defeats the purpose of having the lavender in the first place.


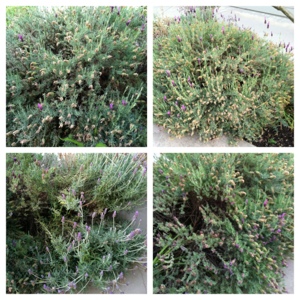
This is my lavender not quite looking its best. 

2.  Pruning also promotes new growth.  The new buds that appear after pruning are so vibrant, and they aren't competing with the mealy old flowers that are way past their prime.

3.  The trimmings can also be used for several purposes, so don't toss them in your green waste.  They can be simmered to add a relaxing aromatic ambiance to your home, they can be marinated in vodka or vinegar (for those of you who don't drink alcohol) to make a relaxing tincture, and lavender flowers can also add a floral sweetness to salads and cookies.

My wife loves coming home to a house smelling like lavender.  I highly recommend simmering your cuttings to create a spa-like atmosphere at home.  This might be a nice touch for Mother's Day, which is coming up fast.  Also, if you're in hot water with your significant other, this might help ease the tension a little, although I can't make any guarantees.

When it comes to pruning your lavender (or most plants), you will learn to get a feel for when it needs to be trimmed back.  By pruning it now, in early Spring, I'm expecting an early Summer bloom, and then I'll revisit it again later this year.  Pay attention to your plants, and they will tell you what they need.  Now I'm off to give my lavender a haircut, and give my wife a fragrant treat. 

Cheers!   

Friday, April 27, 2012

Bake Your Beets

Beets are a great vegetable to grow at home. In addition to the color they add to your garden, beets are packed with potassium, antioxidants, and sweet, sweet flavor. Recently I wrote about using beet greens as a nutritious and colorful salad or soup supplement. Today I'll be writing about another recent discovery of mine - baked beets.

Until last year, I always boiled my beets, and I was left with a feeling that a lot of the nutrients must have been lost in the water because that's where a lot of the color went. To remedy that, I drank the water just in case my hypothesis was right. Also, my beets lost the deep purple color that I love, and turned a little whitish.

The solution? Bake the beets.

Baking your beets takes longer (about 45-60 minutes for two or three big beets), but you retain flavor, nutrients, and color, and you don't have to peel the beets beforehand. Those are all worth the extra time to me.

I've created an illustrated cooking guide for the visual learners out there, and for the linguistic learners, I'll also list the few easy steps for baking your beets.

1. Harvest your beets (or let your kids do it - it's loads of fun for them to pull stuff out of the ground) when the root is starting to show above ground. I use this rule of thumb for carrots, too.

2. Preheat oven to 375 degrees.

3. Wash the beets and remove the tiny ancillary roots.

4. Remove the greens.

5. Place the beets on a sheet of aluminum foil and drizzle with oil (I used olive).

5. Seal up the beets in the aluminum foil.

6. Bake for about 45-60 minutes. This is a great time to prepare your beet greens for a salad. Your beets will be done when you can cut through them easily with a fork.

7. Peel the skin off the beets. This can be done easily using your fingers.

Now your beets are ready for eating. If you want to use them in a salad, simply let them cool off first.

Beets are really fun to grow, and a tasty addition to your table.  Have a good time in the garden.  Happy harvesting.

Cheers!

Thursday, April 26, 2012

How to propagate mint

Mint is a very popular, useful, and tenacious herb. Its leaves can be used in teas and in cooking to add a bright flavor and aid in digestion.

Mint is an aggressive plant, so it doesn't take much effort to spread it around. In fact, many people grow mint in containers so it won't take over the entire garden.

I wanted to grow mint in the bed near the front of my house, and in the bed bordering my back wall, both of which are north-facing. Mint grows well in the shade, so I transplanted some shoots and placed them where other plants might have a harder time thriving die to minimal sunlight.

The picture below shows three different mint patches all grown from transplanting shoots from a mother plant. As you can see, the leaves are almost as big as my finger, so location and method were successful.

Here are the steps I followed.

1. Remove a healthy mint shoot along with part of the shoot that is underground.

2. Plant the shoot in loose, fertile soil (I use Kellogg Garden Soil), either in a pot or the ground (I've had better results in the ground).

3. Water to keep the ground moist, but not too wet. You might even mix in some sand to help the soil drain.

Remember, mint is invasive, so give it a plot of its own, or try it in a pot.

Let me know how it goes. Cheers!

Wednesday, April 25, 2012

Getting Rid of Snails

There is a powerful sense of pride and optimism to see beans sprouting after a couple of weeks of anticipation. There is an equally powerful feeling of frustration and rage to discover only truncated stems remaining of those hopeful bean sprouts.

The culprit? Snails. They are slow, but full of purpose. They are slimy, but determined. Their goal? To rob your family of food, and to rob you of your dignity.

Ok, I am being a bit dramatic, but it is quite disheartening to find snails in your vegetable garden, and no matter how many snails you pitch over the fence, others will come to take their place.

I avoided the use of snail killers for a long time, because I didn't want to be the direct cause of their deaths. I finally put down some Corry's Slug and Snail Pellets after a particularly rainy couple of days revealed to me how many snails shared my residence and my love of vegetables.

It worked like a charm.

Using latex gloves to avoid skin irritation, I sprinkled the pellets around all my veggies, being mindful not to let any of the pellets rest on the leaves of any plants. By the next day, the only signs of any snails were their desiccated shells.

Snails need to stay moist to stay alive, and the metaldehyde in the snail pellets dries them out. It's that simple.

If you want a quick and easy solution to your snail problem, use Corry's Slug and Snail Pellets. It will save you a lot of time, effort, and frustration.

Warnings: Metaldehyde is toxic to pets and humans, which is why you don't want it resting on your fruit and vegetable plants. Keep pets and children away if they like to touch or ingest new things. The pellets will irritate the skin if handled with bare hands, so use gloves when applying the pellets to the garden.

I'm interested I'm hearing about other experiences with snails, so leave a comment and share your stories and solutions.

Happy harvesting! Cheers!

Tuesday, April 24, 2012

Perk Up Your Garden with Coffee Grounds

I recently wrote about how to reduce, reuse, and recycle in the garden, and this idea can be applied to your morning cup of joe, as well.

If you're like me, you probably brew a pot of coffee every day. Instead of throwing out the used grounds, spread them around your garden instead as a nutritious treat for your veggies.

Coffee grounds have high levels of nitrogen, which is a vital nutrient for plants. Specifically, nitrogen promotes leaf growth, so it is particularly useful for leafy greens, onions, and herbs.  I usually dump my used grounds into a bowl with a spoon and let Lily spread the grounds wherever she chooses. It helps to encourage independence and industry, and gets her outside more.

With Earth Day having just passed, and with Arbor Day and Screen-Free Week coming up, this is the perfect time to get yourself and your family out in the garden.  If you don't have a garden yet, then start one!

If you're not a coffee drinker, and you want to try using coffee grounds in your garden, just visit your nearest Starbucks and ask for their used coffee grounds. They give it away freely, and you will probably end up with more than you can use (so share the wealth with other gardeners you know).

Have fun gardening, and happy harvesting.

Cheers!

Monday, April 23, 2012

Bold, beautiful beet greens

Beets have been one of my favorite vegetables since I was a kid. They're colorful, sweet, and they're a healthy way to add great flavor to a salad.

Growing up, I didn't even know that beets had leaves. I should have figured it out, since it's basic plant knowledge that they all have roots, stems, and leaves, but it wasn't until I started growing my own vegetables that I discovered the lesser known, but just as edible beet greens.

Beet greens have a lot of good things to offer. First of all, they add a slightly sweeter taste to your salad. The taste of the greens is similar to the root, and if you've never had beets before, the taste can be compared somewhat to that of corn.

Aesthetically, beet greens add color to your salads, because they aren't totally green. The deep red veins in the leaves are a beautiful contrast to all the green in most salads. In addition to a little color, the slightly thicker beet leaves will add a little texture to your salads. This sturdiness also allows the greens to be cooked, and they would be great in a soup or boiled and served as a side dish.

Nutritionally, beet leaves pack a punch. One cup of raw greens provides almost half of the daily intake of vitamin A (good for vision, skin, and antioxidants) and almost twice the recommended daily intake of vitamin K (good for brain and bone health, and helps against cardiovascular disease). In addition to these benefits, beet leaves are a good source of fiber and potassium.

Final analysis: beet greens are awesome and deserve a place on your lunch or dinner table. Add the fact that the leaves can be harvested sooner than the root, and you've got a winning addition to your recommended rainbow of fruits and vegetables to eat each day.

Happy harvesting!

Saturday, April 21, 2012

How to bag root plumeria

Recently, I wrote about how to grow plumeria from cuttings. After you've taken the steps to remove the branches and allow the wound to seal up, you're ready to plant. Now it's a matter of deciding how to plant them.

This decision depends in what you intend to do with the trees once they're planted.

If you plan to keep some and add to the landscaping around your home, then simply find a spot with good soil that gets a lot of sun and plant the cutting about three inches deep in the soil.  Lightly water, and then only water when it looks dried out.  "Wet feet" will cause your plumeria to rot. 

It's very likely that you will have more cuttings than you plan to use around your home.  If this is the case, you might consider bag-rooting them to prepare them as gifts or for selling at a yard sale.  It's very simple to bag-root your plumeria, and it saves a lot of space because you don't need a pot for each cutting.  

Materials needed:
1.  Plumeria cuttings
2.  Plastic sandwich or food storage bags
3.  Rubber bands
4.  Potting soil

Steps
1. Fill the plastic sandwich bag with potting soil
2. Insert plumeria cutting into moist soil
3. Seal the bag around the base of the cutting
4. Place the bag in the sun (preferably on warm concrete or another warm surface)
5. Let nature do it's work

You don't need to water the cuttings.  Potting soil is already moist when it comes out of the bag, and that will be enough moisture to to the trick.  If the cuttings stay warm (don't try this in the cooler months), you should see roots forming in about a month.  If you anticipate rain, get the cuttings under cover.  You don't want to go through all the trouble of preparing the cuttings, only to have them rot.

Growing plumeria from cuttings is a great way to celebrate Arbor Day and Earth Day, and is a great chance to teach your kids (or yourself) something about plant growth.  Have fun bag-rooting your plumeria, and let me know how it goes!

Cheers!  

Reduce, reuse, recycle in the garden

Earth Day is on Sunday, and starting a garden is a great activity to connect you and your kids with the Earth and grow fresh food.

One problem that arises when growing plants in containers is the number of pots you end up buying.

To save money and Mother Earth at the same time, consider reusing glass jars as planters.

Glass jars add a little bit of style to your garden, and you can add some flare with some ribbon and a little bit of paint.

For those of you with kids, it can be a fun science project where they learn about the parts of a plant as they watch the plant develop. It's just as interesting to watch the roots of a plant grow as it is the stem and leaves.

If your kids are older, they can learn about photosynthesis or about cell differentiation in the roots, stem, leaves, and flowers.

Glass jars don't drain, so be careful not to overwater. Using clear jars, however, allows you to monitor moisture levels in the soil and water accordingly.

Have fun experimenting with glass jars as planters, and happy gardening.

Cheers!

Monday, April 16, 2012

How to grow plumeria from cuttings

Plumeria is a beautiful, sweet-smelling tree that can be propagated easily using cuttings. The first time I saw a plumeria cutting was at the airport in Hawaii and it looked like a stick in a bag. The instructions were pretty simple - stick the cutting in some soil and don't overwater.

The cutting that I bought that day rotted because I overwatered it. When plumeria are rooting, they need to stay warm and they need to be given a chance to get dry before watering again. The roots need to have a chance to seek out the water, or at least that's what I've read.

Well, I hate seeing anything go to waste, so when I pruned our plumeria tree for Lily's birthday party last August, I let all the cuttings dry out for about a week, then I stuck three of them into some dry soil and watched and waited. I am now the proud father of three baby plumeria trees, one of which was adopted by a very good friend. My two remaining trees and their source tree are pictured below.

If you have a plumeria tree and you want some more, it's very easy and FREE to just use your existing tree as a mother to any future plumeria trees you want to grow. Just get a clean cutting tool, find some soil, and follow the steps below.

1. Using your clean cutting tool (I use a mini hacksaw), remove a 12-18 inch cutting that has a little bit of gray bark at the base.

2. Leave the cutting out for about a week so a seal can form where the branch was cut. You can also stick the branch in some sand to help it seal up a little more quickly.

3. When you are ready to plant, choose a spot with good soil and plant the cutting about 3" deep in the soil.

4. Water lightly, and then only water when the soil looks dry. Again, too much water will cause the cutting to rot.

I planted my plumeria cuttings in September, and I started noticing new leaf growth in March. If you plant a cutting in spring, you might get faster results. You might also get faster results if you use a rooting hormone, which I did not.

Have fun growing your own plumeria, and let me know how it goes. Ideas and suggestions are welcome.

Cheers!