Monday, April 30, 2012

Random acts of gardening: Garlic

As I was taking a friend's advice and preparing to sautée some beet greens with garlic and butter, I found this nice little surprise in the vegetable basket.

My heart leapt with joy as my mind immediately planned for which pot and location to plant this welcome surprise. I've never grown garlic before, so I'm glad for the opportunity. I am also very much anticipating a future harvest and propagation of garlic in my garden.

Garlic is good for the heart and helps maintain healthy blood circulation. Perhaps less known is garlic also enhances the immune system. When garlic cells are disturbed by cutting or bruising the clove, allicin is produced, which serves as an antibiotic and inhibits germ growth and reproduction.

It also tastes great! Garlic is like the bacon of vegetables. You can add it to any meal and your food will taste better, but unlike bacon, garlic helps the heart work better.

As part of the allium family, garlic will benefit from a high nitrogen diet, so this little guy will be getting plenty of coffee grounds to aide its growth.

If you want garlic of your own, the next time you buy garlic at the store, save a clove for your garden and experiment with growing it yourself.  

Happy harvesting! Cheers!

Sunday, April 29, 2012

Why Keep the Roses??

I'll admit that when I look at the four big pots I'm currently using for my rose bushes, most of the time I think about tossing the roses so I can grow some food in those pots. They are just "extra" and provide no tangible return of any kind. Right?

Then I see such a perfect looking rose that all I can think about is how much Heather or Lily might like to have such a pretty flower next to their bedside. It is then that my compulsion to grow all the fruits and vegetables my family eats takes a back seat to my desire to strengthen the connection to my girls with the simple, elegant gift of a perfect rose.

This particular rose reminded me that I can't just grow plants that I want to eat. There are plants that just need to be appreciated for their beauty, not for what they can provide us. Life isn't all about mathematics, that is, doing things only for a good return on investment. Sometimes the extras are essential. I may be missing an opportunity to grow some more food, but I'll reap dividends in the relationship to my girls. The roses will stay.

Happy gardening! Cheers!

Saturday, April 28, 2012

Time to prune the lavender

It's human nature to not want to harm anything that is beautiful and natural, especially a delicate flower.  Sometimes, however, a little pain does have a lot of gain.  You may not want to do it, but it's about the right time of year to prune your lavender. 

I almost killed my lavender plants a couple of years ago because I had assumed that they should get pruned just like my roses.  I took my loppers and cut just about every bit of green off of the plant.  Then I read that I almost certainly killed them because of this violent mistake.  My wife reassured me that "living things want to live", and I kept my lavender stubs hoping that she was right.

As is usually the case, my wife was right.  I soon started to see little green nubs growing out from the truncated branches. Those nubs soon grew into fully-grown leaves, and before I knew it, my lavender plants were on the mend and growing just fine.  Once I was sure they could handle it, I moved them from the pots they were in to a bed in front of my house where they would get plenty of sun and grow into a nice hedge.

Out of guilt from my past abuses, I was reluctant to bring the shears even close to my lavender, and now I have an overgrown mangy beast.  I hate to say that about such a beautiful and fragrant flower, but it's true, and it's time to do the unthinkable... I need to prune it again.

BUT... now I know better.

To get the most out of my lavender, I need to trim it with garden shears a couple of times a year, up to about half of the plant.  This sounds harsh, but it has a few benefits:

1.  It keeps the lavender from looking ugly and brown.  This flower doesn't need a lot of maintenance to look its best, but it does need a haircut now and then.  The flowers turn brown if left on their own, and this defeats the purpose of having the lavender in the first place.
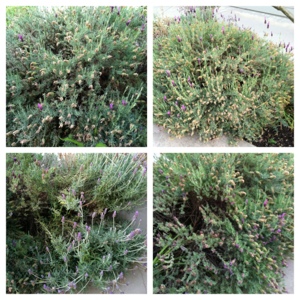

This is my lavender not quite looking its best. 

2.  Pruning also promotes new growth.  The new buds that appear after pruning are so vibrant, and they aren't competing with the mealy old flowers that are way past their prime.

3.  The trimmings can also be used for several purposes, so don't toss them in your green waste.  They can be simmered to add a relaxing aromatic ambiance to your home, they can be marinated in vodka or vinegar (for those of you who don't drink alcohol) to make a relaxing tincture, and lavender flowers can also add a floral sweetness to salads and cookies.

My wife loves coming home to a house smelling like lavender.  I highly recommend simmering your cuttings to create a spa-like atmosphere at home.  This might be a nice touch for Mother's Day, which is coming up fast.  Also, if you're in hot water with your significant other, this might help ease the tension a little, although I can't make any guarantees.

When it comes to pruning your lavender (or most plants), you will learn to get a feel for when it needs to be trimmed back.  By pruning it now, in early Spring, I'm expecting an early Summer bloom, and then I'll revisit it again later this year.  Pay attention to your plants, and they will tell you what they need.  Now I'm off to give my lavender a haircut, and give my wife a fragrant treat. 

Cheers!   

Friday, April 27, 2012

Bake Your Beets

Beets are a great vegetable to grow at home. In addition to the color they add to your garden, beets are packed with potassium, antioxidants, and sweet, sweet flavor. Recently I wrote about using beet greens as a nutritious and colorful salad or soup supplement. Today I'll be writing about another recent discovery of mine - baked beets.

Until last year, I always boiled my beets, and I was left with a feeling that a lot of the nutrients must have been lost in the water because that's where a lot of the color went. To remedy that, I drank the water just in case my hypothesis was right. Also, my beets lost the deep purple color that I love, and turned a little whitish.

The solution? Bake the beets.

Baking your beets takes longer (about 45-60 minutes for two or three big beets), but you retain flavor, nutrients, and color, and you don't have to peel the beets beforehand. Those are all worth the extra time to me.

I've created an illustrated cooking guide for the visual learners out there, and for the linguistic learners, I'll also list the few easy steps for baking your beets.

1. Harvest your beets (or let your kids do it - it's loads of fun for them to pull stuff out of the ground) when the root is starting to show above ground. I use this rule of thumb for carrots, too.

2. Preheat oven to 375 degrees.

3. Wash the beets and remove the tiny ancillary roots.

4. Remove the greens.

5. Place the beets on a sheet of aluminum foil and drizzle with oil (I used olive).

5. Seal up the beets in the aluminum foil.

6. Bake for about 45-60 minutes. This is a great time to prepare your beet greens for a salad. Your beets will be done when you can cut through them easily with a fork.

7. Peel the skin off the beets. This can be done easily using your fingers.

Now your beets are ready for eating. If you want to use them in a salad, simply let them cool off first.

Beets are really fun to grow, and a tasty addition to your table.  Have a good time in the garden.  Happy harvesting.

Cheers!

Thursday, April 26, 2012

How to propagate mint

Mint is a very popular, useful, and tenacious herb. Its leaves can be used in teas and in cooking to add a bright flavor and aid in digestion.

Mint is an aggressive plant, so it doesn't take much effort to spread it around. In fact, many people grow mint in containers so it won't take over the entire garden.

I wanted to grow mint in the bed near the front of my house, and in the bed bordering my back wall, both of which are north-facing. Mint grows well in the shade, so I transplanted some shoots and placed them where other plants might have a harder time thriving die to minimal sunlight.

The picture below shows three different mint patches all grown from transplanting shoots from a mother plant. As you can see, the leaves are almost as big as my finger, so location and method were successful.

Here are the steps I followed.

1. Remove a healthy mint shoot along with part of the shoot that is underground.

2. Plant the shoot in loose, fertile soil (I use Kellogg Garden Soil), either in a pot or the ground (I've had better results in the ground).

3. Water to keep the ground moist, but not too wet. You might even mix in some sand to help the soil drain.

Remember, mint is invasive, so give it a plot of its own, or try it in a pot.

Let me know how it goes. Cheers!

Wednesday, April 25, 2012

Getting Rid of Snails

There is a powerful sense of pride and optimism to see beans sprouting after a couple of weeks of anticipation. There is an equally powerful feeling of frustration and rage to discover only truncated stems remaining of those hopeful bean sprouts.

The culprit? Snails. They are slow, but full of purpose. They are slimy, but determined. Their goal? To rob your family of food, and to rob you of your dignity.

Ok, I am being a bit dramatic, but it is quite disheartening to find snails in your vegetable garden, and no matter how many snails you pitch over the fence, others will come to take their place.

I avoided the use of snail killers for a long time, because I didn't want to be the direct cause of their deaths. I finally put down some Corry's Slug and Snail Pellets after a particularly rainy couple of days revealed to me how many snails shared my residence and my love of vegetables.

It worked like a charm.

Using latex gloves to avoid skin irritation, I sprinkled the pellets around all my veggies, being mindful not to let any of the pellets rest on the leaves of any plants. By the next day, the only signs of any snails were their desiccated shells.

Snails need to stay moist to stay alive, and the metaldehyde in the snail pellets dries them out. It's that simple.

If you want a quick and easy solution to your snail problem, use Corry's Slug and Snail Pellets. It will save you a lot of time, effort, and frustration.

Warnings: Metaldehyde is toxic to pets and humans, which is why you don't want it resting on your fruit and vegetable plants. Keep pets and children away if they like to touch or ingest new things. The pellets will irritate the skin if handled with bare hands, so use gloves when applying the pellets to the garden.

I'm interested I'm hearing about other experiences with snails, so leave a comment and share your stories and solutions.

Happy harvesting! Cheers!

Tuesday, April 24, 2012

Perk Up Your Garden with Coffee Grounds

I recently wrote about how to reduce, reuse, and recycle in the garden, and this idea can be applied to your morning cup of joe, as well.

If you're like me, you probably brew a pot of coffee every day. Instead of throwing out the used grounds, spread them around your garden instead as a nutritious treat for your veggies.

Coffee grounds have high levels of nitrogen, which is a vital nutrient for plants. Specifically, nitrogen promotes leaf growth, so it is particularly useful for leafy greens, onions, and herbs.  I usually dump my used grounds into a bowl with a spoon and let Lily spread the grounds wherever she chooses. It helps to encourage independence and industry, and gets her outside more.

With Earth Day having just passed, and with Arbor Day and Screen-Free Week coming up, this is the perfect time to get yourself and your family out in the garden.  If you don't have a garden yet, then start one!

If you're not a coffee drinker, and you want to try using coffee grounds in your garden, just visit your nearest Starbucks and ask for their used coffee grounds. They give it away freely, and you will probably end up with more than you can use (so share the wealth with other gardeners you know).

Have fun gardening, and happy harvesting.

Cheers!